Spring Boot REST API Controllers, CRUD With H2 Database

Steps
This tutorial consists of steps as follows:
Create project directory.
Extract Spring Boot startup project.
Create RESTful controllers with H2 Database.
Build Spring Boot application.
Define Docker image (Dockerfile).
Build Docker image (execute Dockerfile)
Run Spring Boot Docker container.
Stop Docker container.
Remove Docker container
Remove Docker image
[0] Recommended tools
[0.1] Install PowerShell 7
[0.2] Install Microsoft OpenJDK
[0.3] Install Docker (v.4.24.2)
[0.4] Install Visual Code (x64 v.1.92.2)
[0] Create root directory for all projects
In home directory, create a project root directory.
cd ~
.
mkdir RestfulServiceWithH2DB
.
cd RestfulServiceWithH2DB
.
[1] EmployeeListApp project
[1.1] Create project directory.
mkdir EmployeeListApp
cd EmployeeListApp
[1.2] Extract Spring Boot startup project.
Download spring boot demo project from
https://archive.org/download/spring-boot/spring-boot-3-3-3-maven-demo.zip
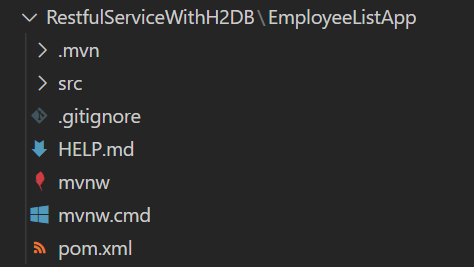
Unzip to ~\RestfulServiceWithH2DB\EmployeeListApp

[1.3] Create RESTful controller.
Before creating the RESTful Controller, we need to make some preparations:
[1.3.1] Add Dependencies
Add the following dependencies to pom file:
<dependency>
    <groupId>org.springframework.boot</groupId>
    <artifactId>spring-boot-starter-data-jpa</artifactId>
</dependency>
<dependency>
    <groupId>com.h2database</groupId>
    <artifactId>h2</artifactId>
    <scope>runtime</scope>
</dependency>
Full code:
File → ~\RestfulServiceWithH2DB\EmployeeListApp\pom.xml
<?xml version="1.0" encoding="UTF-8"?>
<project xmlns="http://maven.apache.org/POM/4.0.0" xmlns:xsi="http://www.w3.org/2001/XMLSchema-instance"
 xsi:schemaLocation="http://maven.apache.org/POM/4.0.0 https://maven.apache.org/xsd/maven-4.0.0.xsd">
 <modelVersion>4.0.0</modelVersion>
 <parent>
  <groupId>org.springframework.boot</groupId>
  <artifactId>spring-boot-starter-parent</artifactId>
  <version>3.3.3</version>
  <relativePath/> <!-- lookup parent from repository -->
 </parent>
 <groupId>com.example</groupId>
 <artifactId>demo</artifactId>
 <version>0.0.1-SNAPSHOT</version>
 <name>demo</name>
 <description>Demo project for Spring Boot</description>
 <url/>
 <licenses>
  <license/>
 </licenses>
 <developers>
  <developer/>
 </developers>
 <scm>
  <connection/>
  <developerConnection/>
  <tag/>
  <url/>
 </scm>
 <properties>
  <java.version>17</java.version>
 </properties>
 <dependencies>
  <dependency>
   <groupId>org.springframework.boot</groupId>
   <artifactId>spring-boot-starter-web</artifactId>
  </dependency>

  <dependency>
   <groupId>org.springframework.boot</groupId>
   <artifactId>spring-boot-devtools</artifactId>
   <scope>runtime</scope>
   <optional>true</optional>
  </dependency>
  <dependency>
   <groupId>org.springframework.boot</groupId>
   <artifactId>spring-boot-starter-test</artifactId>
   <scope>test</scope>
  </dependency>
  <dependency>
   <groupId>org.springframework.boot</groupId>
   <artifactId>spring-boot-starter-data-jpa</artifactId>
  </dependency>
  <dependency>
   <groupId>com.h2database</groupId>
   <artifactId>h2</artifactId>
   <scope>runtime</scope>
  </dependency>


 </dependencies>

 <build>
  <plugins>
   <plugin>
    <groupId>org.springframework.boot</groupId>
    <artifactId>spring-boot-maven-plugin</artifactId>
   </plugin>
  </plugins>
 </build>

</project>
[1.3.2] Create the Employee Repository
Create a repository interface for the Employee entity.
File → ~\RestfulServiceWithH2DB\EmployeeListApp\src\main\java\com\example\demo\repository\EmployeeRepository.java
package com.example.demo.repository;

import com.example.demo.model.Employee;
import org.springframework.data.jpa.repository.JpaRepository;
import org.springframework.stereotype.Repository;

@Repository
public interface EmployeeRepository extends JpaRepository<Employee, Integer> {
}
[1.3.3] Create the Employee Model as Entity
Annotate Employee Model as Entity.
File → ~\RestfulServiceWithH2DB\EmployeeListApp\src\main\java\com\example\demo\model\Employee.java
package com.example.demo.model;

import jakarta.persistence.Entity;
import jakarta.persistence.GeneratedValue;
import jakarta.persistence.GenerationType;
import jakarta.persistence.Id;

@Entity
public class Employee {

    @Id
    @GeneratedValue(strategy = GenerationType.IDENTITY)
    private int id;
    private String name;

    // Default constructor
    public Employee() {}

    // Constructor
    public Employee(int id, String name) {
        this.id = id;
        this.name = name;
    }

    // Getters and Setters
    public int getId() {
        return id;
    }

    public void setId(int id) {
        this.id = id;
    }

    public String getName() {
        return name;
    }

    public void setName(String name) {
        this.name = name;
    }
}
[1.3.4] Create the Employee Service
Define EmployeeService to use the EmployeeRepository.
File → ~\RestfulServiceWithH2DB\EmployeeListApp\src\main\java\com\example\demo\service\EmployeeService.java
package com.example.demo.service;

import com.example.demo.model.Employee;
import com.example.demo.repository.EmployeeRepository;
import org.springframework.beans.factory.annotation.Autowired;
import org.springframework.stereotype.Service;

import java.util.List;

@Service
public class EmployeeService {

    @Autowired
    private EmployeeRepository employeeRepository;

    public List<Employee> getAllEmployees() {
        return employeeRepository.findAll();
    }

    public Employee findEmployeeById(int id) {
        return employeeRepository.findById(id).orElse(null); // Return null if no employee found
    }

    public Employee addEmployee(Employee employee) {
        return employeeRepository.save(employee); // Save the employee to the database
    }

    public void deleteEmployee(int id) {
        employeeRepository.deleteById(id); // Delete the employee by ID
    }

}
[1.3.5] Create the Employee Controller
package com.example.demo.controller;

import com.example.demo.model.Employee;
import com.example.demo.service.EmployeeService;
import org.springframework.beans.factory.annotation.Autowired;
import org.springframework.http.HttpStatus;
import org.springframework.http.ResponseEntity;
import org.springframework.web.bind.annotation.*;

import java.util.List;

@RestController
@RequestMapping("/employees")
public class EmployeeController {

    @Autowired
    private EmployeeService employeeService;

    // Get all employees
    @GetMapping
    public List<Employee> getAllEmployees() {
        return employeeService.getAllEmployees();
    }

    // Get employee by ID
    @GetMapping("/{id}")
    public ResponseEntity<Employee> getEmployeeById(@PathVariable int id) {
        Employee employee = employeeService.findEmployeeById(id);
        if (employee != null) {
            return ResponseEntity.ok(employee);
        } else {
            return ResponseEntity.notFound().build();
        }
    }

    // Add a new employee
    @PostMapping
    public ResponseEntity<Employee> addEmployee(@RequestBody Employee employee) {
        Employee newEmployee = employeeService.addEmployee(employee);
        return ResponseEntity.status(HttpStatus.CREATED).body(newEmployee);
    }

    // Update an existing employee
    @PutMapping("/{id}")
    public ResponseEntity<Employee> updateEmployee(@PathVariable int id, @RequestBody Employee employee) {
        employee.setId(id);
        Employee updatedEmployee = employeeService.addEmployee(employee); // Assuming addEmployee handles update logic
        return ResponseEntity.ok(updatedEmployee);
    }

    // Delete an employee
    @DeleteMapping("/{id}")
    public ResponseEntity<Void> deleteEmployee(@PathVariable int id) {
        employeeService.deleteEmployee(id);
        return ResponseEntity.noContent().build();
    }
}
[1.3.6] Configure H2 Database
Add the following configuration in your application.properties file to set up the H2 database:
# H2 Database Configuration
spring.h2.console.enabled=true
spring.h2.console.settings.web-allow-others=true
spring.datasource.url=jdbc:h2:mem:testdb
spring.datasource.driverClassName=org.h2.Driver
spring.datasource.username=sa
spring.datasource.password=password
Full code:
File → ~\RestfulServiceWithH2DB\EmployeeListApp\src\main\resources\application.properties
spring.application.name=demo
# H2 Database Configuration
spring.h2.console.enabled=true
spring.h2.console.settings.web-allow-others=true
spring.datasource.url=jdbc:h2:mem:testdb
spring.datasource.driverClassName=org.h2.Driver
spring.datasource.username=sa
spring.datasource.password=password
[1.4] Build Spring Boot Application
.\mvnw clean package
[1.5] Define Docker image (Dockerfile)
File → ~\RestfulServiceWithH2DB\EmployeeListApp\Dockerfile
# Use a base image with OpenJDK 17
FROM openjdk:17-slim

# Set the working directory
WORKDIR /app

# Copy the jar file into the container
COPY target/demo-0.0.1-SNAPSHOT.jar demo.jar

# Expose the port the app runs on
EXPOSE 8080

# Command to run the jar
CMD ["java", "-jar", "demo.jar"]
[1.6] Build Docker image (execute Dockerfile)
docker build -t myapp .
[1.7] Run Docker container
docker run -p 8080:8080 myapp
[1.8] Test REST API using Postman
[1.8.1] Install Postman
If you haven’t already, download and install Postman from the official website.
[1.8.2] Start Your Spring Boot Application
Make sure your Spring Boot application is running. By default, it should be accessible at http://localhost:8080.
[1.8.3] Open Postman
Launch Postman and follow these steps for each type of request you want to make.
1. Get All Employees
Method: GET
Steps:
Select “GET” from the dropdown.
Enter the URL.
Click “Send”.
You should see a list of employees in the response body.
2. Get Employee by ID
Method: GET
Replace
{id}with the actual employee ID (e.g.,http://localhost:8080/employees/1)..)Steps:
Select “GET” from the dropdown.
Enter the URL with the specific employee ID.
Click “Send”.
You should see the details of the specified employee or a 404 error if not found.
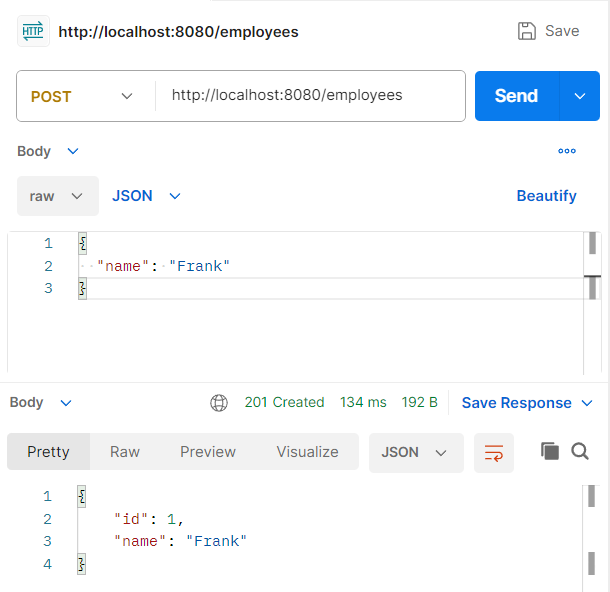
3. Add a New Employee
Method: POST
Body: Select “raw” and choose “JSON” from the dropdown. Enter the employee data in JSON format, like this:
{
  "name": "Frank"
}
- Steps:
Select “POST” from the dropdown.
Enter the URL.
Go to the “Body” tab.
Choose “raw” and select “JSON” from the dropdown.
Enter the JSON data.
Click “Send”.
You should see a response with the details of the newly created employee.
4. Update an Existing Employee
Method: PUT
Replace
{id}with the actual employee ID (e.g.,http://localhost:8080/employees/1)..)Body: Enter the updated employee data in JSON format:
{
  "id": 1,
  "name": "Frank Sinatra"
}
- Steps:
Select “PUT” from the dropdown.
Enter the URL with the specific employee ID.
Go to the “Body” tab.
Choose “raw” and select “JSON” from the dropdown.
Enter the updated JSON data.
Click “Send”.
You should see a response with the updated employee details.
5. Delete an Employee
Method: DELETE
Replace
{id}with the actual employee ID (e.g.,http://localhost:8080/employees/1)..)Steps:
Select “DELETE” from the dropdown.
Enter the URL with the specific employee ID.
Click “Send”.
You should see a 204 No Content response indicating the employee was successfully deleted.
[1.9] Test REST API using CURL
Alternatively, you can test using CURL commands.
POST:
curl --location 'http://localhost:8080/employees' `
--header 'Content-Type: application/json' `
--data '{
  "name": "Frank"
}'
GET:
curl --location --request GET 'http://localhost:8080/employees' `
--header 'Content-Type: application/json'
PUT:
curl --location --request PUT 'http://localhost:8080/employees/1' `
--header 'Content-Type: application/json' `
--data '{
  "name": "Frank Sinatra"
}'
DELETE:
curl --location --request DELETE 'http://localhost:8080/employees/1'
Source Code Example:
https://archive.org/download/java-docker/RestfulServiceWithH2DB.zip